Tuesday, December 27, 2011
luahan perasaan

Monday, December 12, 2011
servis hardware anda
pc hardware
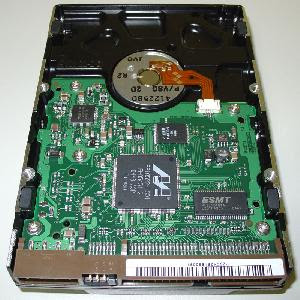
 terdapat banyak hardware dalam sebuah komputer. antaranya ialah :


cara install window menggunakan CD
install windows 7 using usb
*USB Flash Drive (Minimum 4GB)
*Windows 7 or Windows 8 installation files.
Follow the below steps to create bootable Windows 7/Windows 8 USB drive using which you can install Windows 7 or Windows 8 easily.
Procedure:
1. Plug-in your USB flash drive to USB port and move all the contents from USB drive to a safe location on your system.
2. Open Command Prompt with admin rights. Use any of the below methods to open Command Prompt with admin rights.
*Type cmd in Start menu search box and hit Ctrl+ Shift+ Enter.
Or
*Go to Start menu > All programs > Accessories, right click on Command Prompt and select Run as administrator.
3. You need to know about the USB drive a little bit. Type in the following commands in the command prompt:
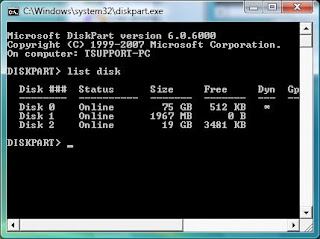
First type DISKPART and hit enter to see the below message.

Next type LIST DISK command and note down the Disk number (ex: Disk 1) of your USB flash drive. In the below screenshot my Flash Drive Disk no is Disk 1.
4. Next type all the below commands one by one. Here I assume that your disk drive no is “Disk 1”.If you have Disk 2 as your USB flash drive then use Disk 2.Refer the above step to confirm it.
So below are the commands you need to type and execute one by one:
SELECT DISK 1
CLEAN
CREATE PARTITION PRIMARY
SELECT PARTITION 1
ACTIVE
FORMAT FS=NTFS
(Format process may take few seconds)
ASSIGN
EXIT
Don’t close the command prompt as we need to execute one more command at the next step. Just minimize it.
5. Next insert your Windows7/Windows 8 DVD into the optical drive and check the drive letter of the DVD drive. In this guide I will assume that your DVD drive letter is “D” and USB drive letter is “H” (open my computer to know about it).
6. Maximize the minimized Command Prompt in the 4th step.Type the following command now:
D: CD BOOT and hit enter.Where “D” is your DVD drive letter.
CD BOOT and hit enter to see the below message.
7. Type another command given below to update the USB drive with BOOTMGR compatible code.
BOOTSECT.EXE /NT60 H:

Where “H” is your USB drive letter. Once you enter the above command you will see the below message.
8. Copy your Windows 7 or Windows 8 DVD contents to the USB flash drive.
9. Change the boot priority at the BIOS to USB from the HDD or CD ROM drive.
Suitable for netbook which does not has any CD ROM. :)
laptop mati mase main game
3.lapik apa2 benda kt bwh laptop tu supaya pengudaraan segar boleh mengalir kt bwh dia 2.eg:kotak rokok 4 penjuru laptop,nk kecik sket,guna kotak mancis takpn buku2 yg tebal
kebiasaan berlaku akan menyebabkan
1.processor/cip rosak
2.graphic card rosak
selamat berjaya. :D
Tuesday, November 29, 2011
HOW TO DIY - Blue Screen

tips and trick windows 7
1. Use Keyboard Shortcuts
Using the mouse, you can drag-”˜n-dock windows to either side of the screen, or drag it to the top to maximize it. These keyboard shortcuts are even faster:
- Win+Left Arrow and Win+Right Arrow dock the window to the left and right side of the screen
- Win+Up Arrow and Win+Down Arrow maximize and restore/minimize
- Win+M minimizes everything
- Alt+Up, Alt+Left Arrow, Alt+Right Arrow navigate to parent folder, or browse Back and Forward through folders in Explorer
- Win+Home minimizes/restores all open windows except the active window
- Alt+Win+# accesses the Jump List of program number ‘#’ on the taskbar
2.Rearrange System Tray Icons
You can rearrange icons on the taskbar as you wish and start new (or switch to running) instances of the first ten taskbar programs using Win+1, Win+2, and so on. The cool thing is you can also rearrange system tray icons. Reorder them on the tray or move them outside or back in the tray. Take control of what you want to always keep an eye on, and from which apps you’ll require notifications.
3. Access Jump Lists with the Left Mouse Button
Jump Lists usually show up when you right-click on a taskbar icon. However, they can also be accessed by holding the left mouse button and dragging upwards. If you’re using a laptop touchpad or a touch screen, this is convenient because you do not have to click any button to access a context menu.
4. Add Any Folder to Favorites
You can add any library or folder to the Favorites section in Windows Explorer. To add a folder, navigate to it in Explorer, right-click Favorites in the left navigation pane, and select Add current location to Favorites. Now you get quick access to your favorite folders in all File->Save As dialogs!
5. Pin Frequently Used Folders to the Taskbar
Right-click, drag, and pin your favorite folders to Windows Explorer on the taskbar. They will now show up in the Jump List when you right click on Explorer giving you quick access to your favorite folders.
6. Pin Control Panel to the Taskbar
You cannot pin the Control Panel to the taskbar via the Start Menu or by drag and drop. Open the Control Panel and right-click its taskbar icon to pin it to the taskbar. An advantage of this is that Control Panel’s Jump List allows quick access to recently used functions.
7. Create Keyboard Shortcuts for Programs
You can create keyboard shortcuts for any program in Windows 7. Right-click the program icon and select Properties. Select the Shortcut tab, click in Shortcut key, to set the keyboard shortcut for that program.
8. Open Command Prompt in Any Folder
Like the command prompt? Miss the “˜Open Command Window Here’ Windows XP power toy? Press “˜Shift’ when right-clicking on a folder to get that option in the context menu. This also works on the desktop. No power toy required!
9. View Expanded ‘Send To’ Menu
Press Shift when right-clicking on a folder to get an expanded Send To menu.
10. Adjust Screen Text with Clear Type
Use Clear Type Tuner for the best look on your LCD monitor or laptop screen. Run “˜cttune.exe‘ from the Start Menu search box, or go to the Control Panel Display applet, and select Adjust ClearType Text from the left.
11. Get Exact Colors On Your Screen
If you are an artist or you work with colors, use the Calibrate Color option in the Control Panel Display applet or run dccw.exe from the Start Menu search box. You can adjust gamma, brightness, contrast, and color balance, ensuring that colors are displayed correctly on your screen.
12. Customize the Power Button
If you restart your computer more often than you shut it down, change the defaultShutdown power button to Restart. Right-click on Start, select Properties, and choose the Power button action that you use the most.
13. Customize Number of Items in Jump Lists & Start Menu
Right-click Start, select Properties, click Customize and choose the number of recent programs to be shown in the Start Menu and the number of items displayed in Jump Listsfrom the Start Menu Size section below.
14. Search Internet from the Start Menu
Enable Internet search from the Start Menu using your default browser. Run GPEDIT.MSCfrom the Start Menu search box to start the Group Policy Editor. In the left pane, go toUser Configuration->Administrative Templates->Start Menu and Taskbar. In the right pane, right-click to Edit and Enable Add Search Internet link to Start Menu.
15. Add Videos to Start Menu
Windows 7 does not place a link to your videos on the Start Menu by default. To add a link to your videos on the Start Menu, right-click Start, select Properties, click onCustomize. In the Videos section at the bottom, choose Display as a link.

